2020WinterTeam3
The Team
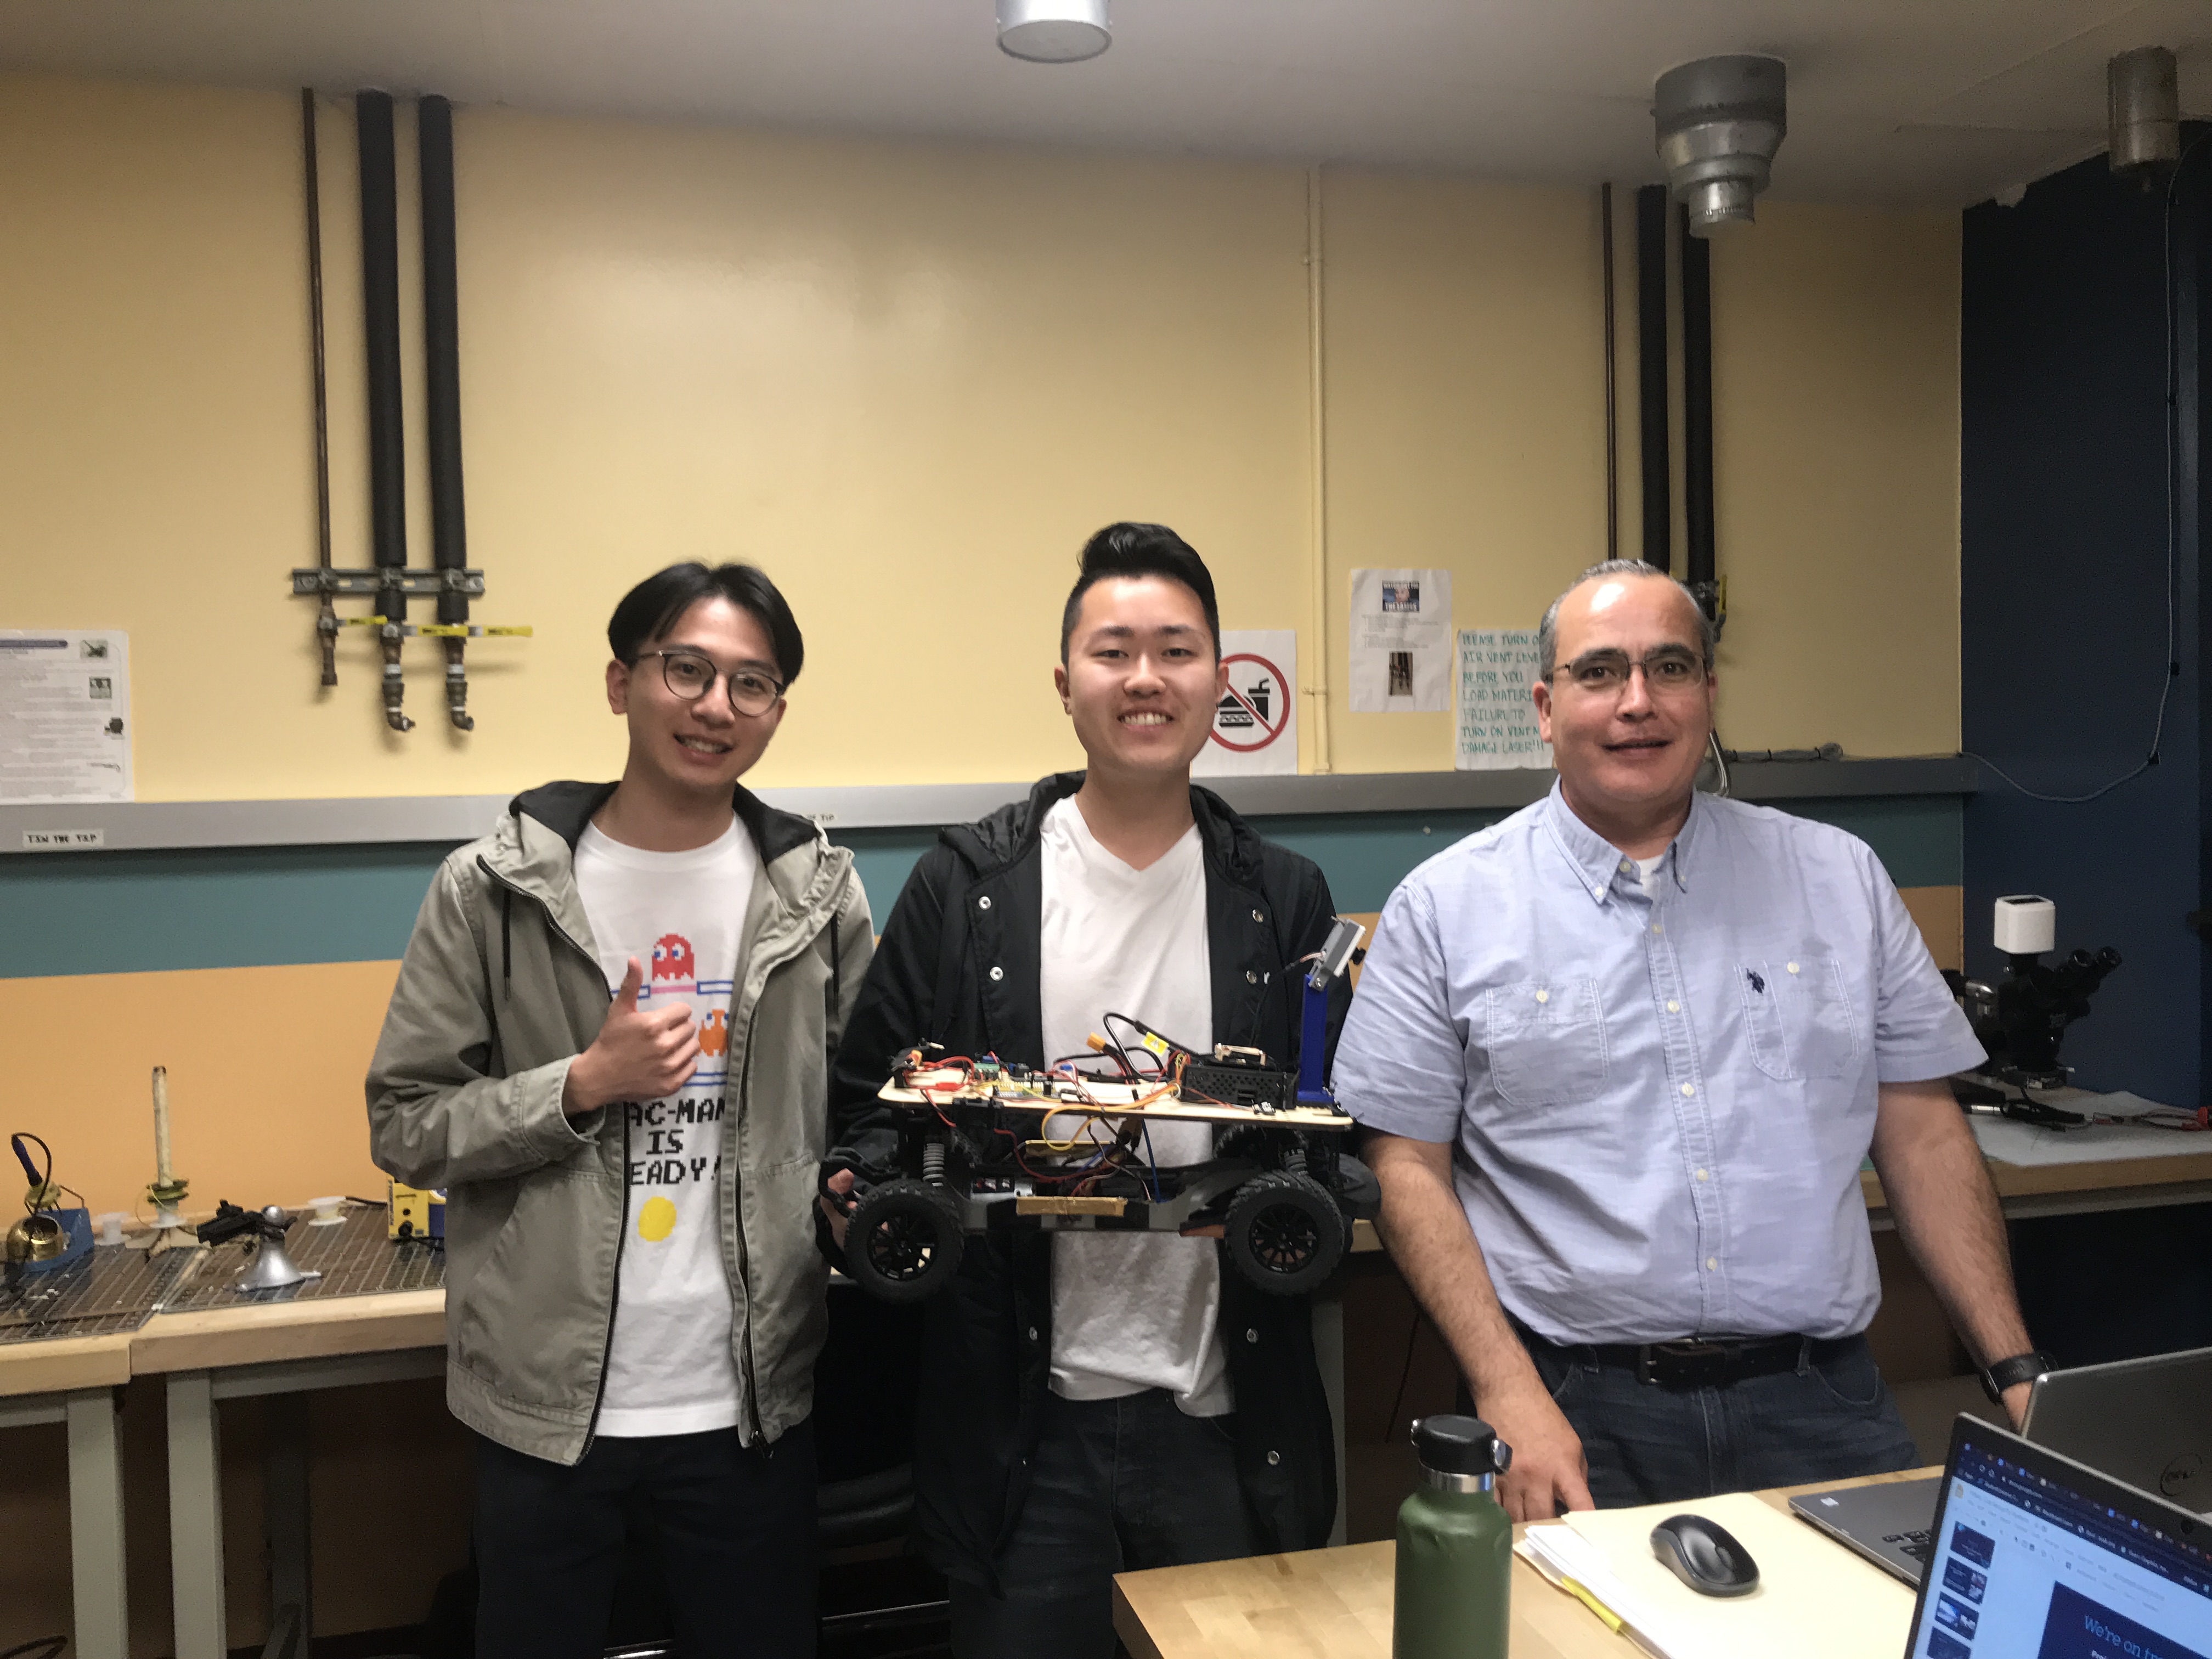
• Golden Hong (ECE)
• Yulin Huang (MAE)
• Felipe Diaz (Extension)
Project Overview
Our team was inspired by the work that Team 6 did in Fall 2019. We found their work with OpenCV to preprocess images from the camera to detect edges/lanes to be very intriguing as this has become a very practical application recently, especially with full-self driving autonomous vehicles on the horizon.
After taking a look at their project, and their work, we decided to further improve upon their project and the lane detection system by improving the OpenCV integration into Donkeycar through the practical functionality and software integration process. Along with the goal of lane detection in variable lighting conditions (more details in the next section), we hope to make the system more robust and try to get the car to train in these more variable conditions.
Objectives
The main objective of this project was to improve the overall framework by incorporating OpenCV.
We wanted to implement a reduced lane keep assist system using OpenCV under variable indoor and outdoor lighting conditions. Along with actual lane detection and perception, the system will be able to take the proper path and plan steering accordingly. In doing so, we also hoped to refine the code by making it more modular.
The reach objective for this project was to implement the system to be transferred to both indoor and outdoor tracks, allowing a smooth transition and more efficient training.
Design
Mechanical Design
 |
 |
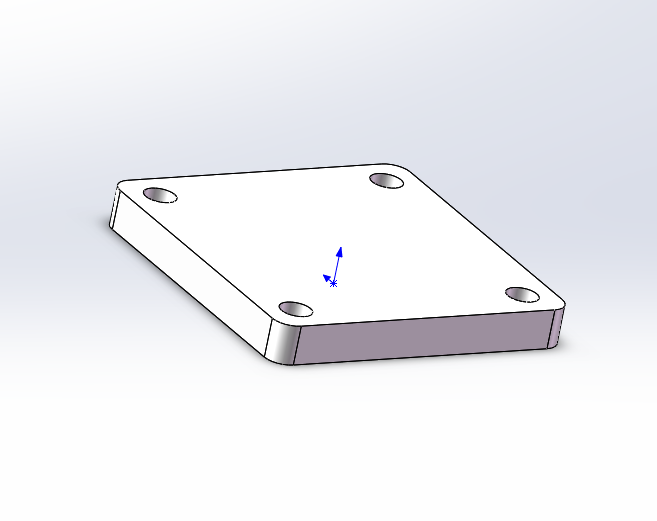 |
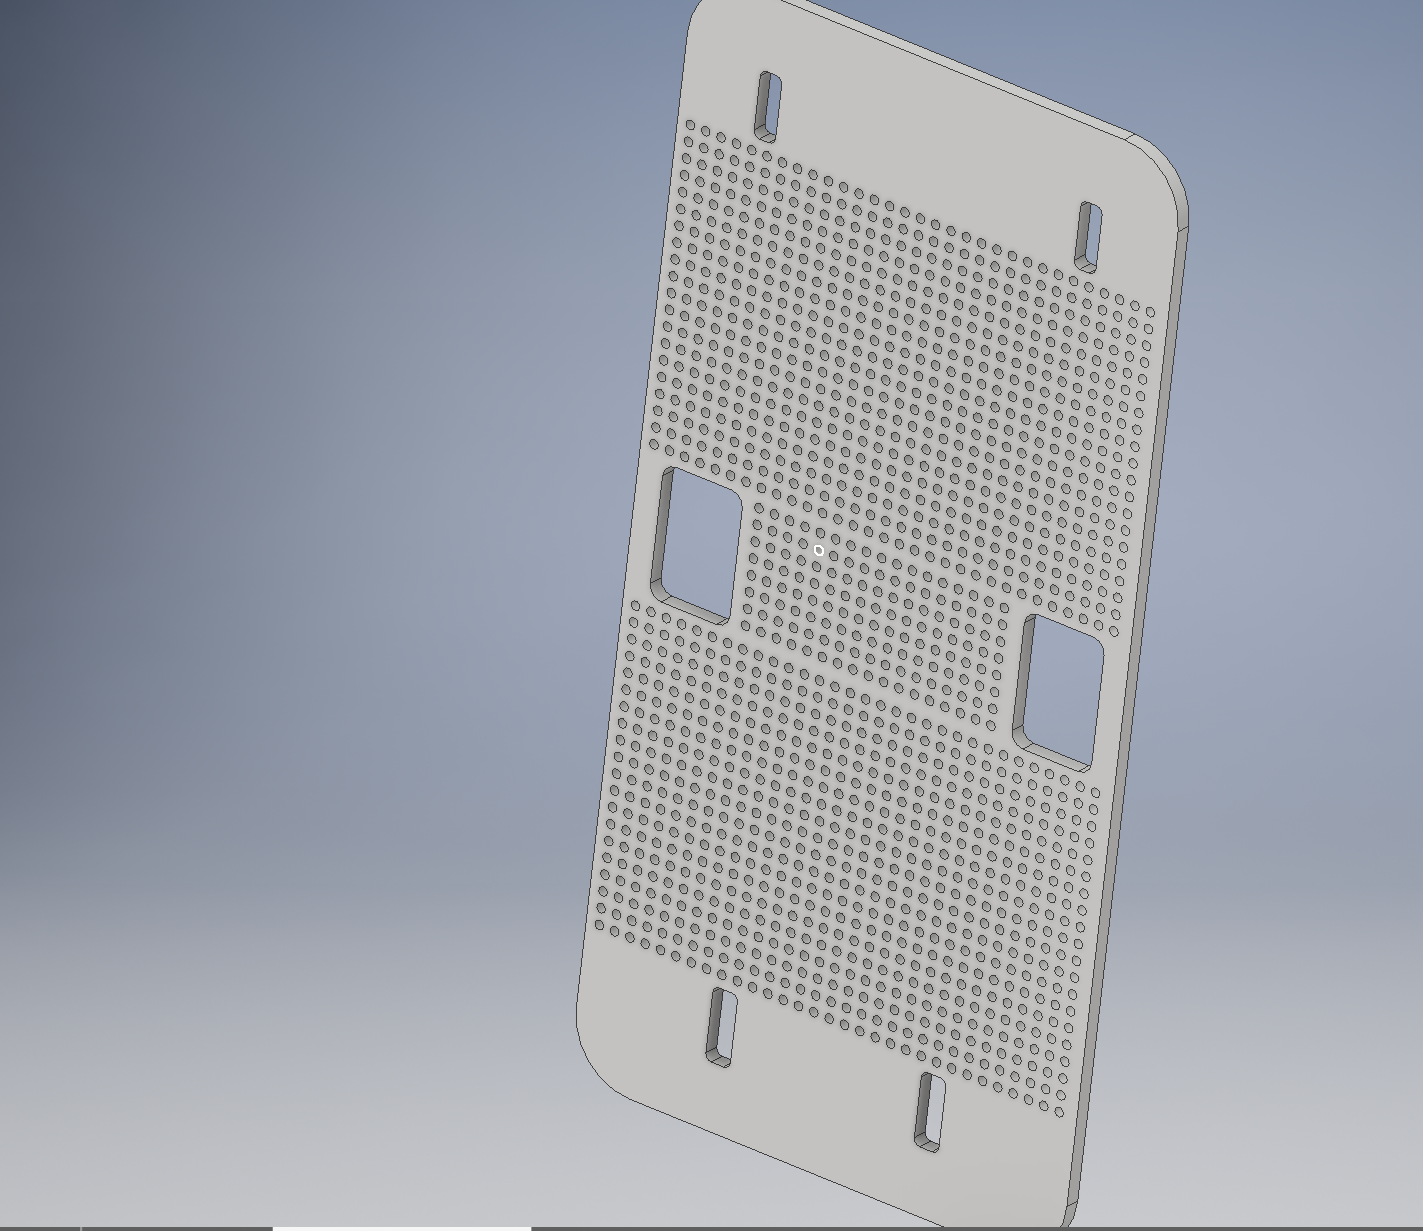
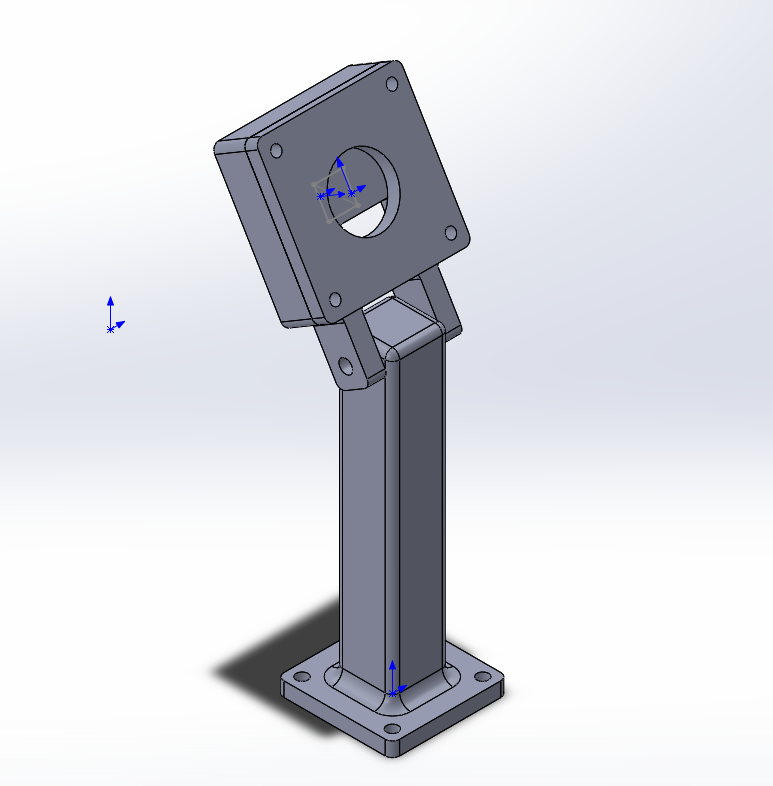
| Figure 1: Platform | Figure 2: Camera Stand | Figure 3: Height Adapter |
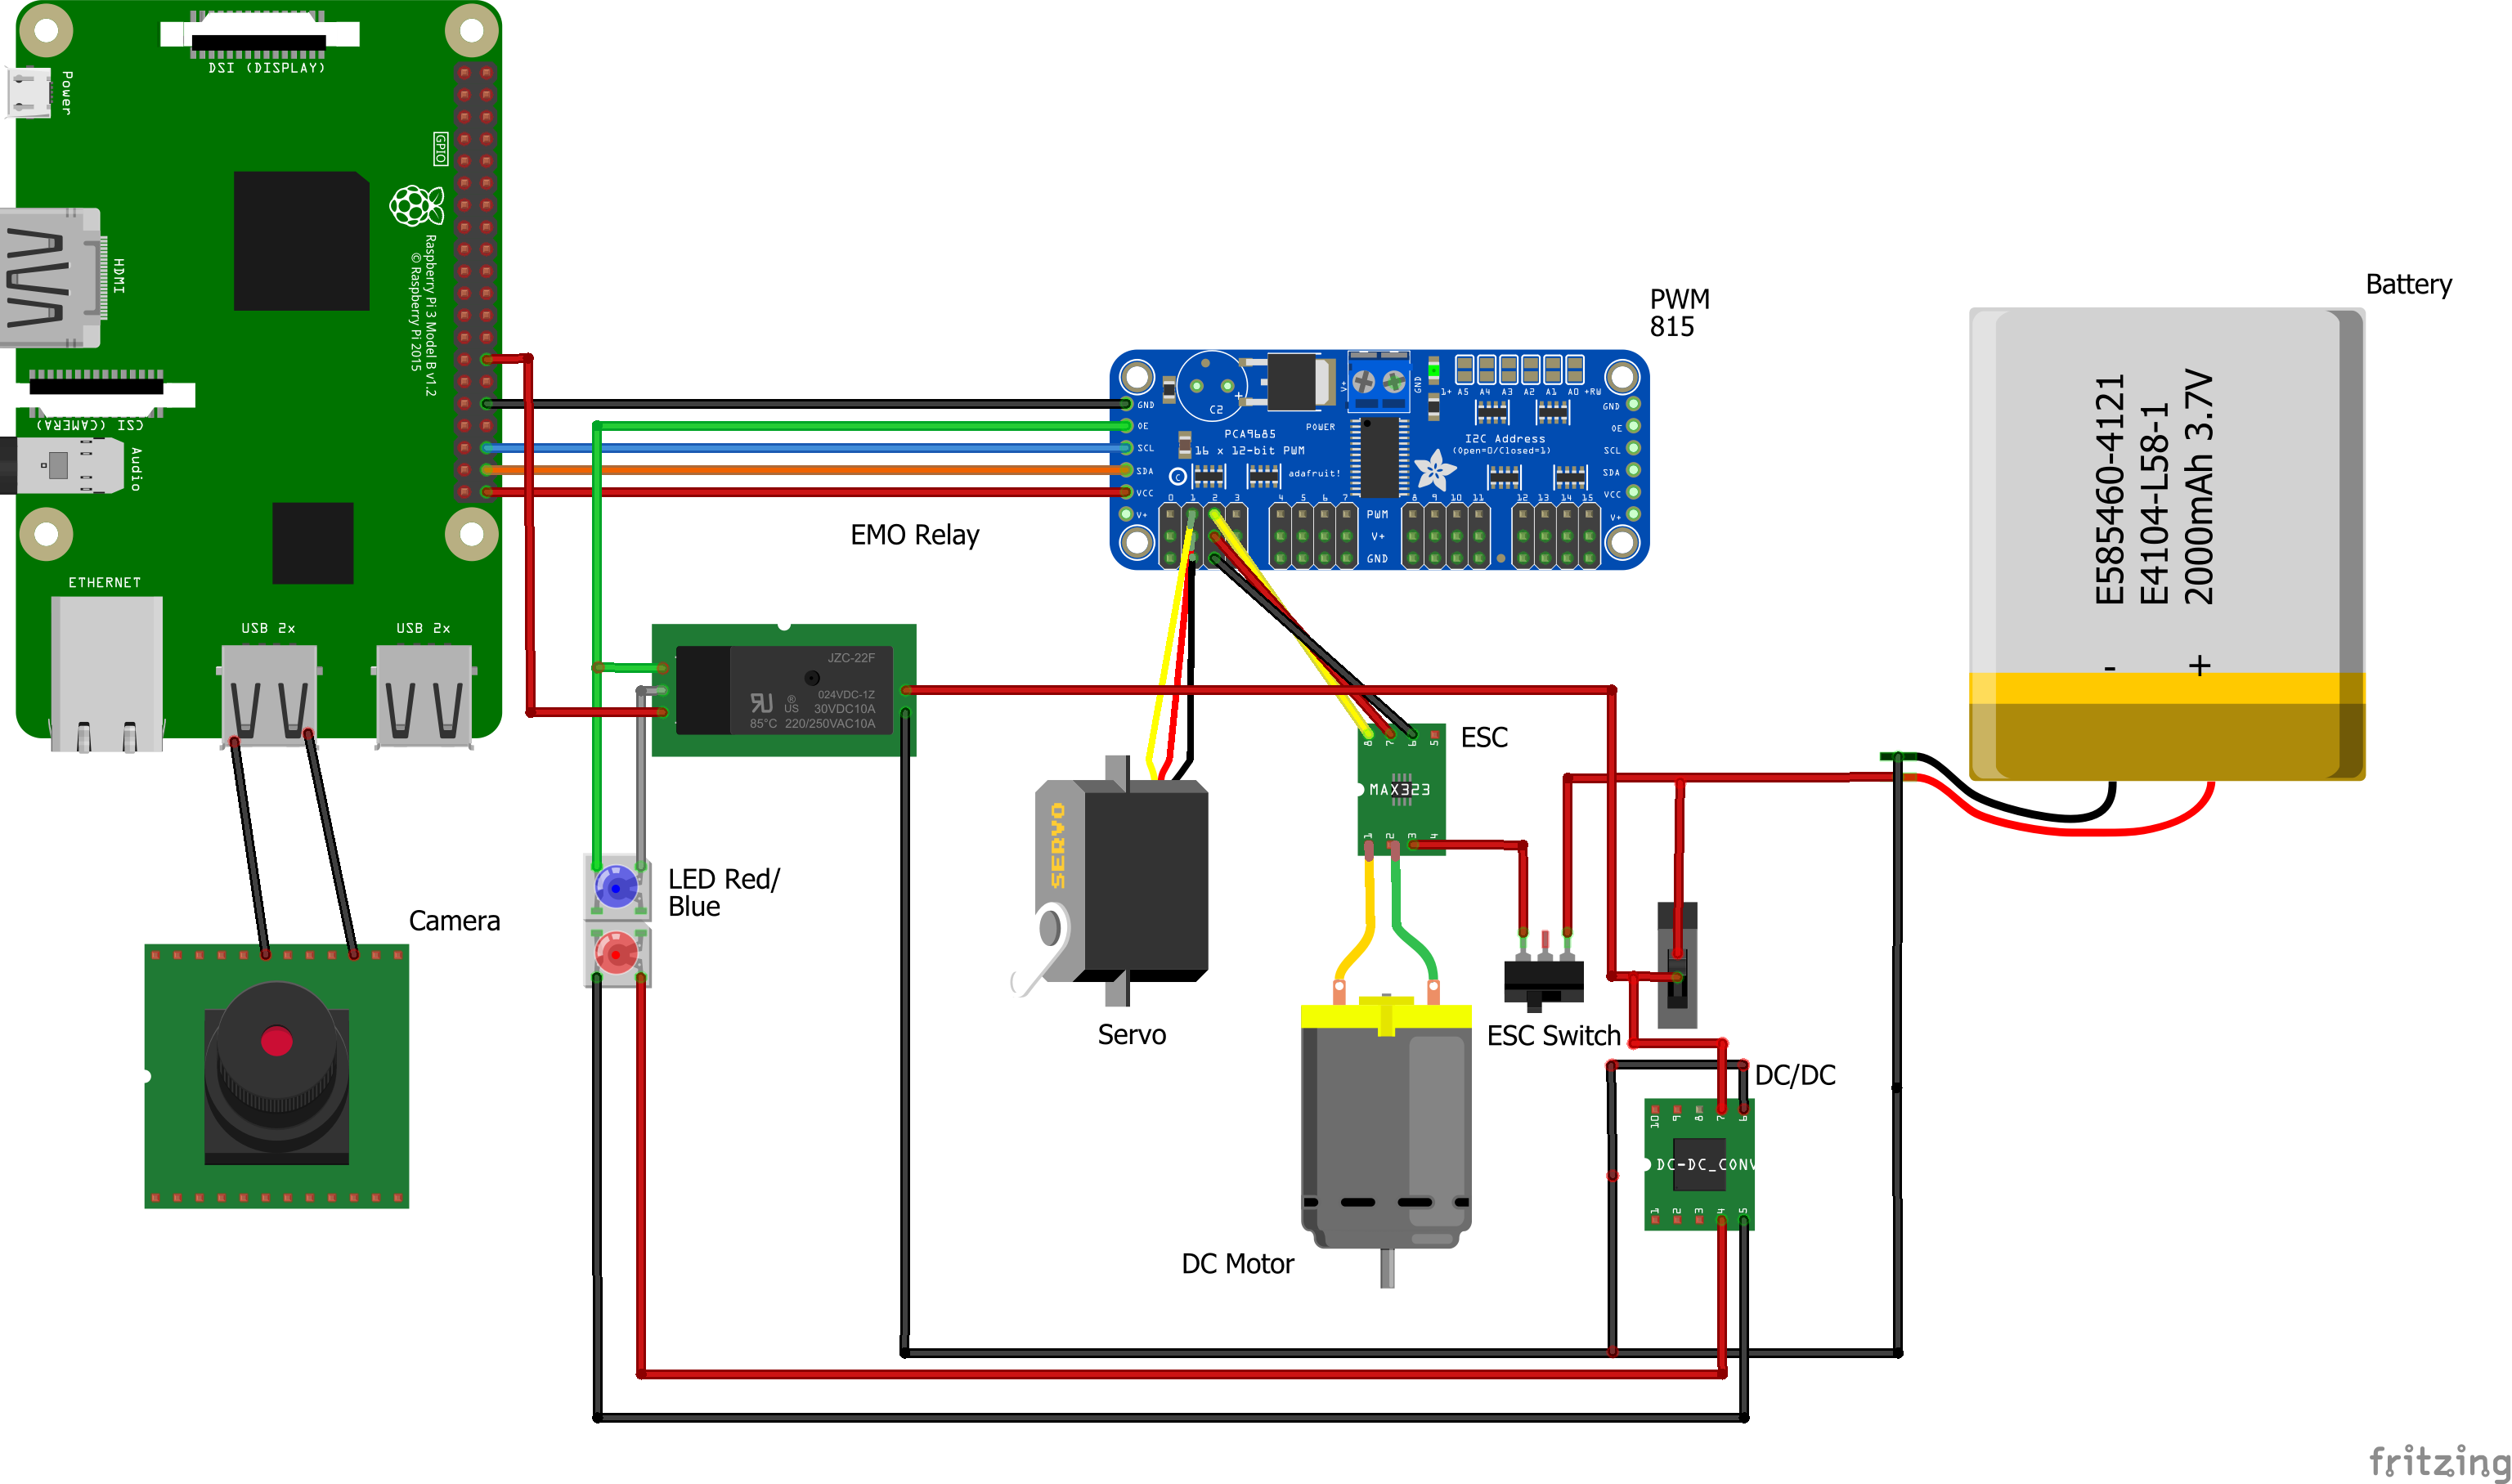
The Donkey car and the basic parts were installed on the car before it was delivered to us. It was our job to make the connections and create the circuit (schematic in the next section). We then designed a platform to enable us to implement all of our other electrical parts onto the Donkey car such as the Jetson, the camera, etc.
We designed a camera stand to be implemented on this platform as a way to raise the camera and protect it in the event of a car crash. This camera stand allows the angle to change in order to accommodate different angles required for the indoor and outdoor track. The outdoor track is larger and wider than the indoor track, so the camera needs to be moved up accordingly to account for this larger required field of view.
We didn't figure out that we needed to adjust the height right away though. The camera stand works perfectly for the indoor track. It has the right height, and we adjusted the angle to fit the indoor track. However, when doing outdoor training, we realized that the camera stand is not high enough to see the entire track. Therefore, we designed a height adapter for the camera stand. It can increase the height of the camera stand by being placed under the camera stand.
In addition, we also created a case to house the Jetson. The Jetson is the most expensive piece we use in our circuit. We better protect from dust, debris, and shock in our daily driving activities!
Components and Electrical Design
Below are the components required to assemble the Donkeycar. This excludes the 3D printed pieces described above.
• Jetson Nano w/ Micro SD and Fan (Car's Computer)
• PWM Board (Servo and ESC Control)
• USB Camera (Front Image Detection)
• Electronic Speed Controller (ESC)
• Red and Blue LED (Activation Indication)
• Voltage Checker (Alarm for Low Battery Life)
• Emergency Relay Switch (Allow Emergency Stop)
• 11.1 V Battery
• 5V Regulator
Below is the Fritzing schematic for our Donkeycar.
Software
Donkey car framework optimization using OpenCV.

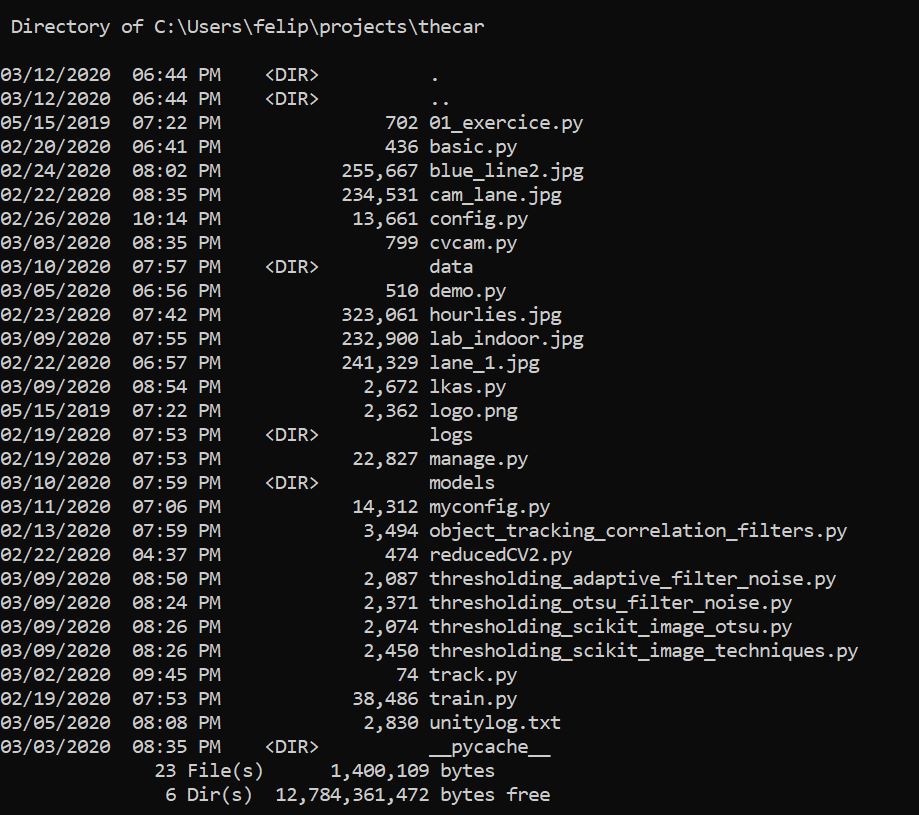
The existing Donkey framework does not link the import part when a new car is created with donkey createcar --path ~/thecar.
The OpenCV part python file needs to be saved under the newly created car directory and then called from inside the manage.py file.
Here is an example of different OpenCV python files under the same thecar directory.
The following code creates an OpenCV part:
OpenCV_part.py
import cv2
import time
class CvCam(object):
   def __init__(self):
       self.cap = cv2.VideoCapture(0)
       self.frame = None
       self.running = True
       self.poll()
   def poll(self):
       ret, self.frame = self.cap.read()
   def update(self):
       while self.running:
           self.poll()
   def run_threaded(self):
       return self.frame
   def run(self):
       self.poll()
       return self.frame
   def shutdown(self):
       self.running = False
       time.sleep(0.2)
       self.cap.release()
class CvImageDisplay(object):
   #@staticmethod
   def run(self,image):
       cv2.imshow('frame', image)
       cv2.waitKey(1)
   #@staticmethod
   def shutdown(self):
       cv2.destroyAllWindows()
The OpenCV_Part.py is then called from either a new vehicle program as listed below or the part can be called from within manage.py(recommended). This code is listed as an example only. To actually add the part to Donkey framework create the OpenCV part V.add() inside manage.py as the dependencies are not direct when the part file is added to the donkeycar ~/donkeycar/donkeycar/part directory.
from donkeycar.vehicle import Vehicle
from OpenCV_Part import CvCam, CvImageDisplay
V = Vehicle() #creates a vehicle
cam = CvCam()
V.add(cam, outputs=["camera/image"], threaded=True) #creates the video capture part
display = CvImageDisplay()
V.add(display, inputs=["camera/image"]) #creates the video display part
V.start() #Starts the vehicle.''
Lane Detection:
A lane keep assist system has two components, namely, perception (lane detection) and Path/Motion Planning (steering). Lane detection’s job is to turn a video of the road into the coordinates of the detected lane lines. One way to achieve this is via the computer vision package, OpenCV. But before we can detect lane lines in a video, we must be able to detect lane lines in a single image. Once we can do that, detecting lane lines in a video is simply repeating the same steps for all frames in a video.
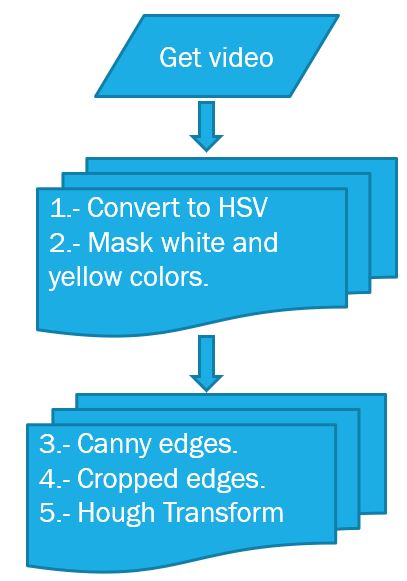
Above flow charts defines the required steps necessary to detect lines in a single image. These functions will need to return a video array as detecting lines in a video is simply repeating the same steps for all frames in a video. These steps are very well explained on the following links:
OpenCV part created by tutor Saikiran Komatineni - skomatin@ucsd.edu
Picture showing the video frame feed to the Donkeycar framework via the "WEBCAM" option made on myconfig.py.
When you select WEBCAM on myconfig.py
One of the manual configurations available on the file myconfig.py, that is created when a new car is made, is the selection of the USB WEBCAM. The video taken by this camera is just one of the three required inputs for the car autonomous driving training. The other two are the angle of the stepper; when turning left or right; and the speed of the car . All these three factors are then feed into the Keras training model and the resulted CNN is capable of autonomous driving.
Please note that the WEBCAM, as installed by default, can be pointing to any given reference and as long it remains constant during the laps training, the resulting CNN model will use these frames disregarding the position. One extreme is that the camera can be pinpointing to the roof during indoors training and still works.
When OpenCV is used, the purpose is to convert the video frames into coordinates matching the lines on the road. This way, as showed on our videos below, the trained car can autonomously navigate independently of the lighting conditions. Camera angle still important to be kept.
Below code explains all the elements when WEBCAM is selected.
When manage.py is executed, a Vehicle() is created and the WEBCAM selected from myconfig.py:
import donkeycar as dk V=dk.vehicle.Vehicle() if cfg.CAMERA_TYPE == "WEBCAM"
Webcam function is called from the donkey car directory. This function uses Pygame. Pygame is a cross-platform set of Python modules designed for writing video games. It includes computer graphics and sound libraries designed to be used with the Python programming language.(pygame.org)
from donkey.parts.camera.import Webcam
When adding an OpenCV part the pixels of the image are manipulated in real time converting them into a numpy arrays. This array is the classified as input and/or output inside the manage.py file.
Parts may have named outputs and inputs. The Donkey framework handles passing named outputs to parts requesting the same named input.
Donkey framework where camA is the selected WEBCAM.
V.add(camA, outputs=['cam/image_array_a'], threaded=True)
Donkey framework part where WEBCAM video is an input to the learning model.
V.add(cam, inputs=inputs, outputs=['cam/image_array'],threaded=threaded)
Adding the OpenCV part to the Donkey framework.
from OpenCV_Part_Python_file import OpenCV_function
Line_Detection = OpenCV_function()
V.add(Line_Detection, inputs = ["cam/image"], outputs = ["cam/image"])
Cam/Image is just a string. Any name can be used.
Results
Indoor Autonomous
Five indoor autonomous laps using the Donkeycar framework. {{#ev:youtube|https://youtu.be/8hgA279CtJk}}
Outdoor Autonomous
Five outdoor autonomous laps using the Donkeycar framework. {{#ev:youtube|https://youtu.be/g9g6bstzrqs}}
Outdoor Autonomous with OpenCV Under Sunlight
Five outdoor autonomous laps using OpenCV integration under sunlight and shadow. {{#ev:youtube|https://www.youtube.com/watch?v=01PsVHcjppo}}
Outdoor Autonomous with OpenCV Without Sunlight
Five outdoor autonomous laps using OpenCV in overcast lighting with the same model as above in a different setting. {{#ev:youtube|https://www.youtube.com/watch?v=GNMDxNuxFGM&t=1s}}
Future Improvements
If we had one more week to improve upon their projects, we would:
• Implement path planning using filters (grey).
• OpenCV autonomous driving and training under different outdoor lighting conditions.
Special Thanks
We would like to extend a special thanks to: Prof. Mauricio de Oliveira, Prof. Jack Silberman, and Saikiran Komatinen for their time and dedication. Our accomplishments would not have been possible without your help and guidance!